

Introduction
Is your Kenmore washer leaking? Don’t panic! Leaks in washing machines are common, but they can usually be fixed easily with a few simple steps.
In this guide, we’ll show you how to fix a leaking Kenmore washer using a real-life experience as a reference. Follow these instructions to fix the problem and get your washer working again quickly.
Related: HOW TO REPAIR THE MOTOR COUPLER
Step 1: Prepare for the Repair
Before diving into the repair process, it’s important to take some necessary precautions. First, ensure that your washer is unplugged from the power source to avoid any potential electrical hazards. Additionally, have a few towels on hand and consider tilting the machine backward to minimize water spillage during the repair.
Step 2: Accessing the Internal Components
To access the internal components of your Kenmore washer, we’ll start by removing the top panel.

Using a paint scraper, gently push in on the right and left hand clips located under the console. Apply some pressure and then pry up to release the console. Once released, tilt the console upward and disconnect the modular connector for the lid switch.
Use a standard head screwdriver to release the two brass clips by pushing in and lifting up. This will free the cabinet, allowing access to the tub and chassis.
Step 3: Identifying the Problematic Part
Now that we have access to the internal components, we need to identify the source of the leak. In our case, the culprit is the water pump. Look for signs of leakage, such as water stains or visible damage. In most cases, after approximately five years of use, the water pump tends to develop leaks.
Step 4: Removing the Old Water Pump
To replace the faulty water pump, start by removing the clips that hold it in place. Use a standard head screwdriver to pry off the clips, and carefully detach the water pump from the motor shaft. Take note of the hoses connected to the water pump, as they need to be removed as well.
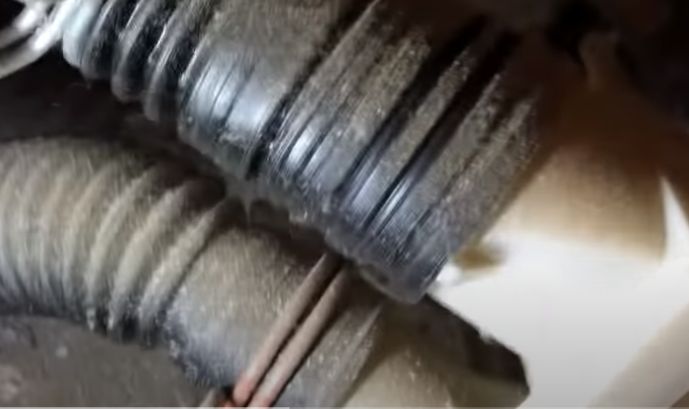
Step 5: Detaching the Hoses
To remove the hoses from the old water pump, use pliers to loosen the hose clamps. Be prepared for water spillage if your machine still contains water.
You can either place towels to absorb the water or tilt the machine back to minimize spillage. Alternatively, consider using a clamp to restrict the flow of water during this step. Remove the top and bottom hoses connected to the water pump.
Step 6: Installing the New Water Pump
With the old water pump removed, it’s time to install the new one. Take the new water pump and attach the hoses securely. Ensure that the motor shaft’s oblong shape aligns with the corresponding shape on the water pump.
Push the water pump onto the motor shaft until it is firmly in place. Then, reattach the two clips to hold the water pump securely.
Step 7: Reassembling the Washer
Now that the new water pump is installed, it’s time to put everything back together. Begin by reattaching the hoses and securing them with the hose clamps. Ensure they are tightened properly to prevent future leaks.
Carefully lift the cabinet at a 45-degree angle, align it with the tub and chassis, and slide it back into position. Make sure the cabinet is straight and snug against the back wall.
Step 8: Securing the Cabinet
To secure the cabinet, insert the brass clips into the back panel first. Press down with your hand to lock them in place. Use your thumb to secure the clips on the other side as well. Ensure that the cabinet is securely fastened before moving on.
Step 9: Reconnecting the Lid Switch
Reconnect the modular connector for the lid switch. Insert the connector into the corresponding slot on the back panel and push it until it’s firmly in place. Double-check that the connection is secure to ensure the proper functioning of the lid switch.
Step 10: Reattaching the Console
Hinge down the console and clip it back into place. The console has plastic legs called “dogs” that fit into specific holes. Align the plastic dog with the first hole and insert the spring part into the hole closest to the front.
Slowly hinge down the console, ensuring the dogs align with their respective holes. Apply downward pressure until the console clicks into place.
Step 11: Final Checks
With the repair complete, it’s time to verify that everything is in order. Fill the washer with water and run a test cycle to check for any signs of leakage. Inspect the area around the water pump and ensure there are no leaks.
If everything looks good, congratulations! Your Kenmore washer is leak-free once again.
Conclusion
Dealing with a leaking Kenmore washer can be a frustrating experience. However, armed with the right knowledge and these step-by-step instructions, you can easily resolve the issue. Remember to take necessary precautions, identify the problem area, and follow the instructions carefully. By successfully replacing the water pump, you’ll have your Kenmore washer back to its optimal performance, ensuring clean and leak-free laundry for years to come.
Frequently Asked Questions (FAQs)
Q1: How do I know if my Kenmore washer is leaking?
A: Look for signs of water around the washer, such as puddles on the floor or water stains on the walls. You may also notice excessive moisture or dampness in the area around the washer.
Q2: Why is my Kenmore washer leaking?
A: Leaks in Kenmore washers can occur due to various reasons, including a faulty water pump, damaged hoses, loose connections, or a malfunctioning seal. Identifying the source of the leak is crucial to determine the appropriate repair steps.
Q3: Can I fix a leaking Kenmore washer myself, or should I call a professional?
A: Many leaks in Kenmore washers can be fixed by following simple steps. However, if you’re unsure or uncomfortable with DIY repairs, it’s always advisable to seek professional assistance to avoid potential damage or injury.
Q4: How often should I replace the water pump in my Kenmore washer?
A: The lifespan of a water pump can vary depending on usage and maintenance. On average, it is recommended to replace the water pump in a Kenmore washer every five years or when leaks are detected.
Q5: What if the water pump replacement doesn’t solve the leakage issue?
A: If replacing the water pump doesn’t resolve the leakage problem, it’s possible that there may be other underlying causes. In such cases, it’s best to consult a professional technician to diagnose and address the issue accurately.
Q6: Are there any preventive measures to avoid leaks in my Kenmore washer?
A: Regularly inspect the hoses for any signs of wear or damage and replace them if necessary. Ensure that all connections are secure and tighten any loose fittings. Additionally, avoid overloading the washer, as it can strain the components and lead to leaks.