
Introduction:
Is your washing machine door seal showing signs of wear, tear, dirt, or even leakage? If so, it’s time to replace it.
In this guide, we will show you how to replace your washing machine’s door seal in a few easy steps. Remember to always turn off the power before attempting any repairs involving live wires. So, let’s get started and restore your machine’s efficiency!
Step 1: Safety First-Turn Off the Power
Before diving into the repair process, it’s crucial to prioritize your safety. Since we’ll be working with live wires, always turn off the power to your washing machine first. This will prevent any accidents and ensure a safe working environment throughout the repair.
Step 2: Remove the Outer Retaining Band
To begin the door seal replacement, let’s remove the outer retaining band. Gently peel back the seal to reveal a small wire. Pry the wire off carefully, ensuring you don’t damage the seal
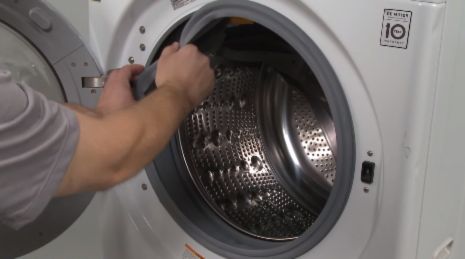
Once the outer retaining band is removed, we can proceed to unclip the door seal from the outside of the machine.
Step 3: Access the Inner Retaining Band
Next, we need to access the inner retaining band that fastens the seal onto the drum. The method to access this band may vary depending on your washing machine model. In this example, we’ll demonstrate how to access it from the top.
However, note that some machines may require removing the front panel for easier access.
Also Read: MY AMANA WASHER WON’T DRAIN
Step 4: Remove the Lid

To reach the inner retaining band, we’ll need to remove the lid. Typically, it’s secured with a couple of screws at the back of the machine. Unscrew them, and the lid should come off easily, granting us access to the inner workings of the washer.
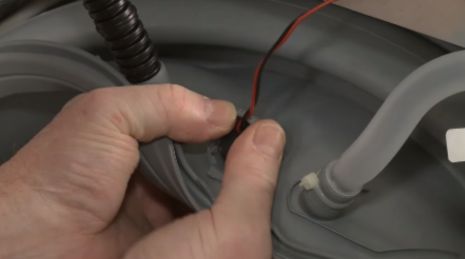
Step 5: Locate and Remove the Inner Retaining Band
Once the lid is removed, you’ll be able to see a similar retaining band to the one on the outside of the machine. Locate it from the top view. To remove this band, follow the same principle as before—move the band to release the seal, allowing it to come out from the front of the machine
Step 6: Prepare the New Door Seal
Before fitting the new door seal, ensure that the drain holes on the bottom of the seal align at the six o’clock position. This positioning allows proper drainage of water during the wash cycle. Once aligned, feed the seal through the front of the machine, ensuring it covers the top part of the drum securely.
Step 7: Replace the Lid
Now that the new door seal is in place, it’s time to reattach the lid. Align it correctly and secure it with the screws at the back of the machine. This step ensures the machine is closed properly and ready for use.
Step 8: Secure the Outer Part of the Seal
With the lid securely in place, we can now secure the outer part of the seal. Carefully fold the seal over the edge of the front of the machine. Although it may seem a bit tricky at first, it becomes easier as you work your way around (screenshot).
Step 9: Attach the Outer Retaining Band
The final step is to attach the outer retaining band. Insert it into the slot of the device, beginning from the side where the hinge is located.
Verify that the strap is positioned accurately and in proper alignment. Conclude by fastening the component with the spring.
Conclusion:
Congratulations! You’ve successfully replaced the door seal on your washing machine, restoring its efficiency and preventing leaks. We hope this guide has been helpful in guiding you through the process. Remember, if you need to order a new door seal or any other spare parts, you can visit sparesderrick.com. Thank you for watching, and happy washing!
Can I Use the Same Steps to Replace the Agitator Assembly on my Amana Washer to Replace the Door Seal?
To replace amana washer’s agitator assembly is a different process than replacing the door seal. While both tasks require specific steps, the agitator assembly replacement involves detaching the agitator cap and unscrewing the bolt, whereas replacing the door seal involves removing the old seal and installing a new one. It is essential to follow the manufacturer’s guidelines for each specific repair.
Frequently Asked Questions (FAQs)
Q1: Can I replace the door seal on my washing machine myself, or should I hire a professional?
A1: Replacing the door seal on a washing machine is a relatively simple task that can be done by most homeowners. However, if you’re unsure about your DIY skills or feel uncomfortable working with electrical components, it’s always best to hire a professional technician to ensure the job is done safely and correctly.
Q2: How often should I replace the door seal on my washing machine?
A2: The lifespan of a door seal can vary depending on factors such as usage frequency and water quality. However, as a general guideline, it’s recommended to replace the door seal every 3 to 5 years or if you notice signs of wear, tear, leakage, or excessive mold and mildew buildup.
Q3: Can I use any door seal for my washing machine, or do I need a specific model?
A3: It’s crucial to use the correct door seal that is compatible with your specific washing machine model. Different machines may have different door seal designs and dimensions. To ensure the proper fit and functionality, always refer to your washing machine’s user manual or consult the manufacturer to find the appropriate replacement seal.
Q4: How can I clean and maintain the door seal to prolong its lifespan?
A4: Regular cleaning and maintenance of the door seal can help extend its lifespan. After each use, wipe down the seal with a damp cloth to remove any debris or detergent residue. Additionally, periodically check for mold or mildew growth and use a mild detergent solution or a mixture of vinegar and water to clean the seal. Ensure the seal is completely dry before closing the washing machine door.
Q5: Are there any troubleshooting tips if the door seal replacement doesn’t solve the leakage issue?
A5: If you’ve replaced the door seal but still experience leakage, it could indicate a separate issue with your washing machine. Check for other potential causes such as loose connections, damaged hoses, or faulty water inlet valves. If the problem persists, it’s advisable to contact a professional technician to diagnose and repair the issue.
Q6: Can I reuse the old door seal if it appears to be in good condition?
A6: While it may be tempting to reuse the old door seal if it seems to be in good condition, it’s generally recommended to install a new seal when performing a replacement. Over time, door seals can deteriorate internally or develop hidden defects, which may compromise their performance and lead to future issues. It’s best to err on the side of caution and install a fresh, reliable seal.
Remember, if you have any specific questions or concerns about your washing machine or the door seal replacement process, it’s always advisable to consult the manufacturer’s guidelines or seek professional assistance.